Ingredients:
- 'Paint Bucket' tool to create the background colour
- Marquee tools for selection
- Custom shape tool for creating your blog's symbol
- Text tools or any 3d text photoshop tool to create your blog's title
Open your Photoshop application. Then choose File -> New (or Ctr + N) from the top menu in Photoshop main window. Enter your banner file name, in the preset combo box choose Web, enter your banner's width and height. My blog banner's width is 880 pixel. I'm using Blogger with Simple template. In the colour mode you can choose "RGB Color". In the background contents you can choose White.
Step 2: Create your banner theme colour
You can select the main colour of your banner by dragging the panes: R, G, B in the colour panel. Or you can also enter the colour values into the text box on the right of the panes.

After choosing a suitable colour, you can click the 'Paint Bucket' tool from the Photoshop toolbox on the left. Gradient Tool and Pain Bucket Tool are grouped together as they are similar tools. You can click while pressing Alt button to navigate through the tools in this group to choose "Paint Bucket" tool.

This 'Paint Bucket' tool allows you to easily fill your banner with your selected colour.

Step 3: Create your blog's symbol
Create a new layer (press Shift-Ctrl-N in Windows or Layer -> New -> Layer). In the new pop up dialog window you can give your new layer any name that you like.

Choose the 'Rectangular Marquee Tool' or 'Elliptical Marquee Tool' in the toolbox.
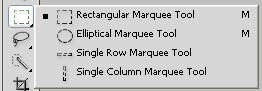
By using this tool, create a rectangle or eclipse with your chosen size in the left or right of your banner. This area will contain your blog's symbol. You can pick a colour and use 'Paint Bucket' tool to create the background colour of your blog's symbol.

You can then add some text or draw some shapes to form your blog's symbol by creating a new layer and choosing the 'Custom Shape Tool' in the toolbox. You can press Shift-Ctrl-N in Windows or Layer -> New -> Layer. In the new pop up window you can give your new symbol layer any name that you like.

Choose 'Custom shape symbol' from the toolbox.

In the options bar, you can choose the suitable shape for your blog's symbol.

In case you already have an image file containing your blog's symbol. You can open it in another Photoshop window and use the 'Rectangular Marquee Tool' or 'Elliptical Marquee Tool' to copy it to the clipboard. Then switch back to your Photoshop window containing your banner image and paste it.
Finally, you can add your blog's title to your banner! Create a new layer.

Choose the text tool 'Horizontal Type Tool' from the toolbox. Pick a colour of your blog's title. You can also adjust the font name, size, etc... of your blog's title in the Options bar.
 Click to the banner where you would like to put your blog's title. Enter your blog's title (mine is tutorials4share) and move it to a suitable position.
- Hold down the left mouse button, drag the mouse cursor and then press Shift key to create a square selection with 'Rectangular Marquee Tool'.
- Hold down the left mouse button, drag the mouse cursor and then press Shift key to create a circle with 'Rectangular Marquee Tool'.
- You can move your blog's symbol by first moving to the Layers panel and selecting the layer containing the symbol and then returning to your canvas and pressing Ctrl button and dragging your symbol.
- To create 3D text, you can search for some thing like 'photoshop 3d text'.
- If you do not see the Layers panel in your working window, you can press F7 to open it.


No comments:
Post a Comment