Flexibility in defining styles is the heart of any blog. Here are simple steps helping you override existing CSS styles in your Blogger blog through using Google Blogger Template Designer.
Step 1: Sign in to your blog
Visit Google Blogspot home page at: http://blogspot.com/ or http://www.blogger.com/ and sign in with your Google account.
Visit Google Blogspot home page at: http://blogspot.com/ or http://www.blogger.com/ and sign in with your Google account.
Step 2: Go to your chosen blog Dashboard
A Google account can have many blogs. When you sign in to your blog, you are presented with the main dashboard. You can click any link (NEW POSTs, Edit Posts, etc....) under your chosen blog title to go to the dashboard of your chosen blog.

Step 3: Add New Blog Style
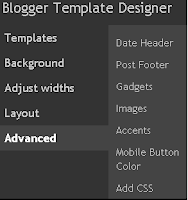
Choose Design / Template Designer / Advanced / Add CSS.
Enter your modified CSS codes to "Add Custom CSS" tab. Click "Apply to Blog" button for your blog to apply modified styles and override the existing ones.
Notes:
A Google account can have many blogs. When you sign in to your blog, you are presented with the main dashboard. You can click any link (NEW POSTs, Edit Posts, etc....) under your chosen blog title to go to the dashboard of your chosen blog.

Step 3: Add New Blog Style
Choose Design / Template Designer / Advanced / Add CSS.
Enter your modified CSS codes to "Add Custom CSS" tab. Click "Apply to Blog" button for your blog to apply modified styles and override the existing ones.
Notes:
- In "Add Custom CSS" tab you can enter new CSS styles or enter modified existing CSS styles to override them.
- In order to see your added CSS styles or modified ones, you can click "Back to Blogger" and choose Design / Edit HTML. In your template editor window, locate the following code:
]]></b:skin>
- Your CSS styles should appear above the ]]></b:skin> code.
- Having said that, you can also directly add new CSS styles or modify existing ones by going to your blogger blog template editor window, locate the ]]></b:skin> code, and enter your CSS styles above the ]]></b:skin>


No comments:
Post a Comment